If you have just setup a VPS or server with ISPConfig and have completed the “Perfect Installation Guide” from the ISPconfig website, you will want to host domains on the server. You will need to first setup the nameserver setup portion of your installation so that you can then move on to actually creating the domain/website account on the server.
This tutorial shows how you can run your own name servers for domains that you register with your domain registrar. Once you setup your own nameservers in ISPConfig, you will then be able to register those nameservers at your domain registrar and use them with the accounts you setup on the server.
This tutorial assumes that you have already installed ISPConfig using the perfect installation guide found on the ISPConfig website, and have already logged in and created the website by clicking on “Sites –> Add Site” and creating the account for the domain you will be using.
Create The Zone domain.com In ISPConfig
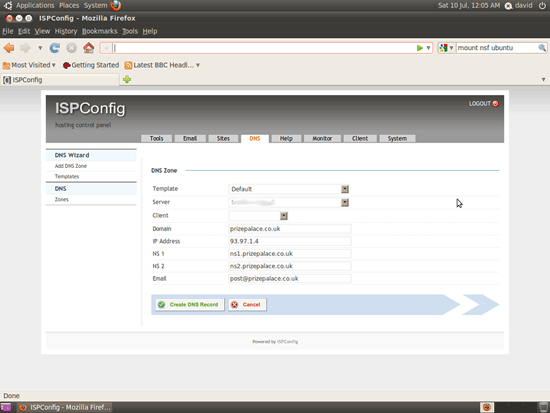
To begin the process, first login to ISPConfig. Click on the “DNS” tab. We click on Add DNS Zone and fill in the form. For IP address, a box may pop up saying “suggested IP”. You can click it and use it. Or, type in your servers IP address as we did in our example. Then, for domain, put in the name of your domain. Finally, for NS1/NS2, put in the nameservers that you will be registering with your domain registrar and using for hosting your websites. By default, you almost always will use “ns1.domain.com” and “ns2.domain.com”, replacing domain.com with the name of your domain:

Now click on ‘Zones’. Click on the zone you created; ‘domain.com’.
You will now see some zone records there already that were created with the wizard as below:

Now we will add an ‘A’ record for NS1 so you can later register it with your domain registrar. Click the ‘A’ icon and fill in the form as shown below. The IP address is the IP of your VPS.

Now repeat this for NS2.

Your server is now ready to begin using your custom nameservers. The last step is to login to your domain registrar and register your ns1/ns2.domain.com domain with the IP address of your VPS as we did above on the server-side of this process. Once you do this, you will be able to create websites/domains on this server, and use the nameservers you have created without having to go through this process again


